Hey everyone,
Sorry it's been a while since I've posted. However, there's new goodies on my NEW blog over at www.thedirtydishblog.com. Check it out!

Monday, August 19, 2013
Wednesday, January 23, 2013
Lemon, chicken, basil, rice soup
Hey people,
It's been a while I know. I'm sorry for the lengthy absence, but I do have a treat for you! A delightfully light and fresh soup that will wake you up and make you feel all warm and fuzzy at the same time. I must give my mother most of the credit for this recipe. When we lived in California, we used to go to this great little bakery cafe that served the most amazing soups. The idea comes from them, but they certainly were not about to share their recipes. Mom mastered this recipe, with feedback from me of course :-) It is so healthy, surprisingly different, and scrumptiously simple with it's bright fresh flavors. And in case you didn't know, this is a play on a classic Greek soup with lemon and basil, but I've never seen one quite like this. It's also a super fast and easy weeknight meal.
IMPORTANT: It has come to my attention that if you use a lemon press, you will get way more lemon juice from your lemons, making this soup way too tart. If you use a lemon press, please cut the lemon juice in half.
It's been a while I know. I'm sorry for the lengthy absence, but I do have a treat for you! A delightfully light and fresh soup that will wake you up and make you feel all warm and fuzzy at the same time. I must give my mother most of the credit for this recipe. When we lived in California, we used to go to this great little bakery cafe that served the most amazing soups. The idea comes from them, but they certainly were not about to share their recipes. Mom mastered this recipe, with feedback from me of course :-) It is so healthy, surprisingly different, and scrumptiously simple with it's bright fresh flavors. And in case you didn't know, this is a play on a classic Greek soup with lemon and basil, but I've never seen one quite like this. It's also a super fast and easy weeknight meal.
Lemon Chicken, Basil, Rice Soup
1 Rotisserie Chicken, or
1 pound of cooked chicken, roughly chopped
2 Tbsp. Olive Oil
1 medium Onion, diced
2 ribs of Celery, diced
4 lemons (peel the skin off of one and juice all of them, reserving the juice
separately from the peel)
1 stalk of Lemon Grass, chopped into large pieces.
20 large leaves of fresh basil (no substitute), roughly chopped
5 Cups of chicken Stock
½ cup of uncooked Rice
Salt
PepperDirections:Start by removing the meat from your rotisserie chicken and
chopping it so that no piece is bigger than 1 inch square. Set your chicken aside.In a large soup pot, heat the oil over high heat until it is
starting to shimmer. Add the Onion and
celery and reduce the heat to
medium. Stir until both vegetables are
starting to brown slightly.Add the chicken, chicken stock and rice, lemon peel, lemon grass,
half of the basil and half of the lemon juice and stir to combine.Reduce the heat to low and cover. Let simmer on low until the rice is cooked
through.At this point you will need to pull out the lemon peel and
chunks of lemon grass, as best you can, and throw them away.Stir in the remaining lemon juice and basil, taste and serve.
IMPORTANT: It has come to my attention that if you use a lemon press, you will get way more lemon juice from your lemons, making this soup way too tart. If you use a lemon press, please cut the lemon juice in half.
*Note, the strength of chicken broth can vary greatly. I use "Better than Bullion" to create my own broth on most occasions. If you taste your soup and it seems a little weak, add a little more broth or bullion to create a more rich chicken flavor. The same applies to the lemon and basil. If you like a more lemony or basily (not sure that's a word) flavor, add more lemon juice or basil. The success of all recipes are subjective to your own personal tastes and should be adjusted to suit your own preferences.
Serves 8
EnJoy!
Thursday, September 13, 2012
Sweet Potato Muffins
Ah! Fall is in the air again. How I love it so. Pumpkin Spice latte's are back on tap at your local Starbucks and all things pumpkin are here again. There's a crispness in the air that makes me feel oddly awake and sleepy at the same time. And of course this begins the fall winter baking spree that I go on every year. Lucky for you guys, I like sharing :-) Here's my recipe for Sweet Potato muffins, that are brushed with butter and rolled in cinnamon sugar. I have had similar muffins (not sweet potato) called donut muffins. They are moist, not too sweet on the inside, but have a sweet sugar coating on the outside to balance it out. It's a beautiful thing the donut muffin! I have also made these with pumpkin puree before and they are equally delicious, although I will caution you to make sure you get pumpkin puree and not pumpkin pie filling. They are different.
Sweet potato puree can be found in cans at the grocery store. It is usually in a similar place as the pureed pumpkin. If in doubt, ask a store attendant, as they can both be a little challenging to find. Don't give up though! These are sooo good.
For the muffins:
2-1/2 cups all-purpose flour
1-1/2 teaspoons baking powder
1/2 teaspoon table salt
1/4 teaspoon baking soda
1/4 teaspoon ground nutmeg
1/3 cup buttermilk
1/3 cup whole milk
1/2 cup sweet potato puree (from 1 baked potato)
1 teaspoon vanilla extract
1 stick unsalted butter, room temperature
3/4 cup brown sugar
2 eggs
For the topping:
1/2 cup sugar
2 teaspoons ground cinnamon
1/4 teaspoon ground nutmeg
1 stick unsalted butter, melted
Preheat oven to 350*
In a medium bowl, combine all purpose flour, baking powder, salt, baking soda and ground nutmeg. Set aside.
In a large pour-able measuring cup combine whole milk, buttermilk, sweet potato puree and vanilla extract. Set aside.
In a large bowl, cream unsalted butter and brown sugar with an electric mixer, until fluffy. Add eggs, one at a time, beating well after each addition. Alternately mix in dry and wet ingredients into the butter, starting and ending with the dry; mix only until each addition is incorporated, being careful not to overmix.
Coat a muffin pan with nonstick spray and fill muffin cups 1/2 full. Bake for 20-25 minutes, or until a toothpick inserted into the center of the muffin comes out clean.
While muffins are baking, in a shallow bowl, combine granulated sugar, ground cinnamon and ground nutmeg. In a separate bowl, melt 1 stick of unsalted butter.
When the muffins are cool enough to handle, yet still warm, remove muffins from the pan, brush them completely with the melted butter, and roll in the sugar mixture to coat.
Thursday, August 23, 2012
Dark Chocolate, Pistachio, Smoked Sea Salt Cookies
When I was making the bacon chocolate chip cookies in my previous post, I decided to take advantage of the process and make these cookies as well. My friend Jenn sent me a link to Joythebaker's recipe, which served as inspiration. I'll giver her credit for the flavor combo, but I'll take credit for the cookie recipe :-)
These were my favorite of the two. They are deliciously sweet and savory!
2 1/8 cups of flour
1/2 teaspoon of salt
1/2 teaspoon of baking soda
12 Tablespoons of butter, melted and cooled slightly
1 cup of brown sugar
1/2 cup sugar
1 egg
1 egg yolk
2 teaspoons vanilla extract
1 cup of dark chocolate chunks
1 1/2 cups chopped pistachio (shelled of course)
2 tsp of smoked sea salt (mine was alder wood smoked, but any kind will work)
Preheat the oven to 325 degrees and place the rack in the center of the oven.
In a microwave safe bowl, melt the butter and set aside to cool slightly. In the bowl of a mixer, place both of the sugars and butter. Mix on medium high speed until slightly lighter in color and well incorporated. Add the eggs and vanilla and stir to incorporate. Add the remaining dry ingredients (except the chocolate chunks) and blend well to incorporate. Remove your bowl from the mixer and fold in the chocolate chunks. **I buy the large bars of dark chocolate from Trader Joes and cut my own chunks from the bar.
Use a 1/4 cup measuring cup to scoop out the dough and place on an un greased cookie sheet. Sprinkle each cookie with a couple of pinches of the smoked salt and bake for 15-18 minutes.
******Please note that I have had reports of people making these regular chocolate chip cookies and having them go flat. Two things: Firstly, check your baking soda, it does go bad over time and can effect the rise of your cookie. Secondly, these cookies do best when you make them big. If you use less than a 1/4 cup of dough per cookie, you need to crank up the heat to 350 and start checking them for doneness at 10 minutes. The baking temperature and time noted above are designed for a larger cookie.
Bacon, Chocolate Chip Cookies...Yep you heard me.
In order to convince a couple of co-workers to get something fairly important taken care of, in a somewhat timely manner (meaning on my time line :-)), I bribed them with cookies. Of course in my desire to please, I asked what kind of cookie they would like. Since they are three men, one of them says "I don't care, something with bacon". Ah ha! A challenge? Yes please!
I vacillated between a peanut butter/bacon cookie and this one, but eventually settled on the bacon chocolate chip. It received rave reviews (especially from the guys), and I have even adjusted my recipe below based on a few suggestions and my own opinions. Mine didn't have enough bacon :-)
2 1/8 cups of flour
1/2 teaspoon of salt
1/2 teaspoon of baking soda
12 Tablespoons of butter, melted and cooled slightly
1 cup of brown sugar
1/2 cup sugar
1 egg
1 egg yolk
2 teaspoons vanilla extract
1 cup of dark chocolate chunks
1 lb of bacon
Preheat the oven to 325 degrees and place the rack in the center of the oven.
Chop the bacon into a semi small dice, and place in a frying pan over high heat. Fry until the bits are light golden brown (remember that once they are cooking in the dough, they will brown a bit more as well, so don't over do them). Remove from the pan and drain on a paper towel. Set aside until cool.
In a microwave safe bowl, melt the butter and set aside to cool slightly. In the bowl of a mixer, place both of the sugars and butter. Mix on medium high speed until slightly lighter in color and well incorporated. Add the eggs and vanilla and stir to incorporate. Add the remaining dry ingredients (except the chocolate chunks) and blend well to incorporate. Remove your bowl from the mixer and fold in the chocolate chunks. **I buy the large bars of dark chocolate from Trader Joes and cut my own chunks from the bar.
Use a 1/4 cup measuring cup to scoop out the dough and place on an un greased cookie sheet. Bake for 15-18 minutes.
******Please note that I have had reports of people making these regular chocolate chip cookies and having them go flat. Two things: Firstly, check your baking soda, it does go bad over time and can effect the rise of your cookie. Secondly, these cookies do best when you make them big. If you use less than a 1/4 cup of dough per cookie, you need to crank up the heat to 350 and start checking them for doneness at 10 minutes. The baking temperature and time noted above are designed for a larger cookie.
 |
| Everything's better with Bacon, even your owies! |
I vacillated between a peanut butter/bacon cookie and this one, but eventually settled on the bacon chocolate chip. It received rave reviews (especially from the guys), and I have even adjusted my recipe below based on a few suggestions and my own opinions. Mine didn't have enough bacon :-)
2 1/8 cups of flour
1/2 teaspoon of salt
1/2 teaspoon of baking soda
12 Tablespoons of butter, melted and cooled slightly
1 cup of brown sugar
1/2 cup sugar
1 egg
1 egg yolk
2 teaspoons vanilla extract
1 cup of dark chocolate chunks
1 lb of bacon
Preheat the oven to 325 degrees and place the rack in the center of the oven.
Chop the bacon into a semi small dice, and place in a frying pan over high heat. Fry until the bits are light golden brown (remember that once they are cooking in the dough, they will brown a bit more as well, so don't over do them). Remove from the pan and drain on a paper towel. Set aside until cool.
In a microwave safe bowl, melt the butter and set aside to cool slightly. In the bowl of a mixer, place both of the sugars and butter. Mix on medium high speed until slightly lighter in color and well incorporated. Add the eggs and vanilla and stir to incorporate. Add the remaining dry ingredients (except the chocolate chunks) and blend well to incorporate. Remove your bowl from the mixer and fold in the chocolate chunks. **I buy the large bars of dark chocolate from Trader Joes and cut my own chunks from the bar.
Use a 1/4 cup measuring cup to scoop out the dough and place on an un greased cookie sheet. Bake for 15-18 minutes.
******Please note that I have had reports of people making these regular chocolate chip cookies and having them go flat. Two things: Firstly, check your baking soda, it does go bad over time and can effect the rise of your cookie. Secondly, these cookies do best when you make them big. If you use less than a 1/4 cup of dough per cookie, you need to crank up the heat to 350 and start checking them for doneness at 10 minutes. The baking temperature and time noted above are designed for a larger cookie.
Monday, August 20, 2012
Thai Pineapple Yellow Curry
I LOVE ASIAN FOOD! If you've perused my other posts, or if you've ever eaten out with me more than once, you can't miss this fact. It just feels like home to me.
I have several Thai restaurants that I love, each of them for different reasons (or actually dishes). One of them makes a delicious yellow pineapple curry. It's a little sweet, has plenty of heat (without burning off your taste buds) and make the most satisfying meal!
Here is my attempt at copying it. I came really close and this is really easy to make.
2 Medium sized Chicken Breasts (sliced as thinly as you can)
One yellow onion (cut into 1 or 11/2 inch chunks)1 Cup of Bamboo shoots (or one can, I think they're all the same size)
Half of a yellow Bell Pepper (cut into 1 inch chunks)
Half of a red Bell Pepper (cut into 1 inch chunks
2 cans of coconut milk
2 Tbs Oil
2 Tbs Thai Yellow Curry Paste
1 Tbs. Soy Sauce
2 Tbs brown sugar (Palm if you have it, but who keeps that on hand?)
3-4 Kaffir Lime leaves (I know who keeps these either? Go to your local Asian food store and ask for them. They are usually kept in the freezer or refrigerator section)
1 tsp. of Lemon grass powder (also at the Asian food store)
Juice of two limes
1 Cup of pineapple chunks
1 Cup of frozen peas
8 large leaves of basil, chiffonade (or cut into ribbons)
Salt to taste
Start out this recipe by preparing all of your ingredients. This dish goes pretty quickly, and it's important not to overcook the vegetables in this dish. If you have all of your items washed, cut, measure and lined up, you will find that you are much more successful.
Start with your chicken: I find it easier to get a really nice thin slice on the chicken meat if I cut it when it is slightly frozen still. It's not so squirmy that way and tends to stay in one place easier and enables you to get a nice thin slice. It's also important to get thin uniform slices, as your cooking time on the chicken is dependent on it. One of the secrets to a good curry is to have tender moist chicken, and the technique I describe later is important to this dish.
Cut the remaining items and place in separate bowls for one by one addition to the pan.
In a large saute pan (or wok) over high heat, combine the oil, curry paste and Kaffir lime leaves. Stir fry until the paste is starting to bubble and become fragrant. It's ok if it doesn't actually bubble, you just want to make sure to toast all of the spices in the curry paste and open up their flavor a bit. As soon as you can smell a pungent aroma of curry and lime, you are ready for the next step.
Stir in the onion and let cook for one minute. Add the two cans of coconut milk and bring to a simmer. Add your bell peppers, and all of the seasonings. Stir well and bring back to a boil. Stir in the chicken and the remaining ingredients (except the pineapple, peas and basil). Cook until the chicken is cooked through. This will not take long, as the chicken will cook fairly fast, depending on how thin you cut the meat. Once the chicken is cooked, turn off the heat and stir in the pineapple, peas and basil.
Check the flavor your curry and adjust the seasonings. If you like it a little sweeter, you might want to add more sugar. If you like it saltier, add more soy or salt. If it tastes dull and heavy, add more lime.
Serve over steamed white rice and enjoy!
There are a lot of ingredients you can put in this dish. Just remember that the more ingredients you add, the more sauce you will need to make. If you simply substitute ingredients (I.E. baby corn instead of bamboo shoots) you should be fine with the recipe as is.
Some good additions are: baby corn, potato chunks, snow peas.
P.S. I'll add pics to this later.
Wednesday, August 15, 2012
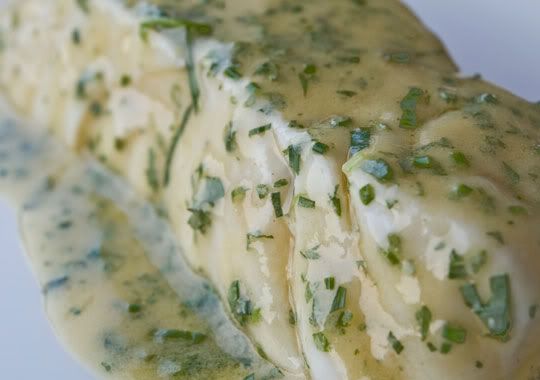
Summer Halibut
I made a recipe this last week, of halibut, roasted with sweet onions, citrus and fresh herbs. It was so delicious and simple, that it felt slightly sinful to eat. Remember that fresh (truly fresh) fish will not have that unpleasant "fishy" flavor, so if yours has that, you may want to seek a more reputable fish monger. Alternately, you could visit a lake or stream near you. After doing a little research, check out what I found out about the health benefits of halibut:
Just Two Servings of Omega-3-rich Fish a Week Can Lower Triglycerides
Protection against Fatal Heart Arrhythmia
Help Prevent and Control High Blood Pressure
Stroke Prevention
Eating Fish Daily Provides Substantially More Protection against Heart Attack
Fish, Fruit and Vegetables Protective against Deep Vein Thrombosis, Pulmonary Embolism
Promote Detoxification
Cancer Protection
Lower Your Risk of Leukemia, Multiple Myeloma, and Non-Hodgkin Lymphoma
Halibut and Other Fatty Fish Highly Protective against Kidney Cancer
Fish -- Food for Better Thought as We Age
Omega-3 Fat, DHA, Destroys Alzheimer's Plaques
Omega-3-Rich Diet Improves Mood, Reduces Depression
Who knew eating something so delicious would be so good for you?
I recommend serving this fresh steamed or sauteed green beans, and roasted potatoes or quinoa.
I recommend serving this fresh steamed or sauteed green beans, and roasted potatoes or quinoa.
4 (approximately) 6oz pieces of fresh Halibut
1 Tbs. Olive Oil
One sweet onion (white or yellow)
1tsp. garlic powder
2 Tbs. butter
2 tsp. fresh thyme
1 Tbs. fresh chives
2 lemons
Salt and Pepper
Preheat your oven to 400*
Slice the onion into thin rings and arrange them in the bottom of a 9x13 casserole dish. Drizzle them with the Olive Oil and sprinkle lightly with salt and pepper. Place the pan in the oven to roast for 15 minutes.
In the mean time, season the fish with salt and pepper, garlic powder, half of the herbs, and the zest of one of the lemons and the juice of one lemon. Lay each fillet in the pan on top of the onions and place in the oven to roast. You should roast it for 10 minutes per inch of thickness on your halibut steaks.
While your fish is roasting, combine the remaining herbs and juice of the lemon along with the 2Tbs of butter. Stir to combine.
Once your fish is done roasting, remove it from the oven. Divide the herb butter in 4ths, and spread each portion over the fish fillets.
Plate, serve and EnJoy!
Subscribe to:
Posts (Atom)