So a 25 pound turkey was definitely not made for 7 people. But of course why would you only make enough for Thanksgiving dinner. After all, the leftovers are just as much a ritual as the actual day of turkey feast. This year I decided to make turkey enchiladas with some of the left over meat. After a challenge from a friend, we decided to have a turkey enchilada off. I'm happy to report that mine won! I also made yellow rice to go along with them, and it's the perfect combination!
Enchilada's:
3 cups of turkey meat, cut into bite size pieces
1 Tablespoon of Oil
1/2 onion, finely chopped
1 large clove of garlic
1 teaspoon cumin
1 cup salsa verde
1 cup sour cream
1 Tablespoon chopped jalapenos (from the can)
1 cup of cotija cheese, shredded or crumbled
1/2 cup shredded Mexican cheese blend
1/2 cup cream cheese
1/2 cup turkey or chicken stock
10 6 inch corn tortillas
Rice:
2 cups long grain rice
1 Tbs turmeric powder
4 cups water
1 tsp salt
2 bay leaves
2 garlic cloves smashed
For rice:
Combine all ingredients, over high heat. As soon as it comes to a boil, reduce the heat and simmer for 20 minutes or until water is absorbed. Fluff with a fork and serve alongside the enchiladas.
For Enchiladas:
In a small bowl, combine the salsa verde, 1/2 cup of the sour cream and the chopped jalapenos. Stir together and set aside.
In a saute pan over high heat, place 1 Tablespoon of oil, heat to shimmering and place the onions and garlic and cumin in the pan. Reduce heat to medium and stir until the onions are soft and translucent.
Add the chopped turkey meat, half of the salsa mixture, half of the cream cheese, half of the shredded cheese and half of the cotija cheese, and turkey stock. Heat to combine and melt the cheeses.
Grease a 9x13 inch pan.
Working with one tortilla at a time, fill with 2 heaping tablespoons of filling, roll them cigar style and lay seam side down in the casserole dish. Continue until all of the tortillas are filled. Pour the remaining salsa mixture over the top and top with all of the remaining cheeses and sour cream.
Place in 350 degree oven and bake for 20 minutes or until the cheese is golden and bubbly.
Serve with rice and enJoy!

Saturday, November 26, 2011


Sunday, November 20, 2011
Gobble Gobble
As is evidenced by this blog, I LOVE to cook! I inherited this gift from my mother and as a result, holiday's around our house means food wars between my mother and me. Only occasionally does it get ugly. We usually manage to keep the peace. Our wars always revolve around the food choices. My mom tends to prefer the traditional and I tend to prefer the out of ordinary fare. I might make mashed potatoes, but they will have browned butter, or boursin cheese stirred in. In order to keep the peace, I have made it my goal to find ways to improve on texture and taste while keeping the traditional aspect alive. This turkey recipe is the absolute best way to make a turkey hands down. Please don't feel like you have to use the exact same flavors as I have listed here, but the basic recipe is essential. I like the flavors of classic sage, rosemary and thyme, but I don't like them to be too bold, so I have toned them down with the addition of citrus, apples and onions. But please don't skip on the brining process, it surely creates the most moist and flavorful meat possible.
Please note that you will need to plan ahead, as the brining process takes 24 hours prior to cooking your turkey.
Brine:
Position a rack in the lower third of an oven and preheat to 400°F.
In a bowl, using a wooden spoon, beat the butter, herbs, orange zest, salt and pepper until well blended. Set aside.
Gently slide your fingers under the breast to loosen the skin and work your fingers down to the thigh, being careful not to tear the skin. Spread one-third of the butter mixture evenly under the skin. Spread one-third of the mixture inside the body cavity, then spread the remaining mixture evenly on the outside of the turkey. Truss the turkey if desired using kitchen twine.
Place the turkey, breast side up, on a rack in a large roasting pan and roast for 45 minutes. Reduce the heat to 325°F and continue roasting, basting every 30 minutes with the pan juices. After about 2 1/2 hours of total roasting time, begin testing for doneness by inserting an instant-read thermometer into the thickest part of the breast and thigh, away from the bone. The breast should register 165°F and the thigh, 175°F. If the breast begins to cook too quickly, tent it loosely with aluminum foil. Total roasting time should be 3 to 3 3/4 hours.
Transfer the turkey to a carving board, cover loosely with foil and let rest for 20 minutes before carving.
Serves 12 hungry people.
Please note that you will need to plan ahead, as the brining process takes 24 hours prior to cooking your turkey.
Brine:
- 3/4 cup salt
1/2 cup brown sugar
2 oranges, quartered
2 lemons, quartered - 2 Apples, quartered
- 4 sprigs thyme
4 sprigs rosemary - 4 leaves of fresh sage
- One large onion sliced thickly
- To make the brining solution, dissolve the salt and sugar in 2 gallons of cold water in a non-reactive container (such as a clean bucket or large stockpot, or a clean, heavy-duty, plastic garbage bag.) Add the oranges, lemons, apples, thyme, rosemary, sage and onion.
Note: if you have a big turkey and need more brine than this, use 1/2 cup salt and 1/2 cup brown sugar for every gallon of water.
Turkey Ingredients:
8 Tbs. (1 stick) unsalted butter, at room
temperature
2 tsp fresh Thyme - 2 teaspoons fresh rosemary
- 1 tsp fresh sage
- Finely grated zest of 2 oranges
Finely grated zest of 1 lemon
1/2 tsp. freshly ground pepper
Directions:
Remove the turkey from the brine, rinse well with cold water, pat dry and let the turkey stand at room temperature for 1 hour.
Position a rack in the lower third of an oven and preheat to 400°F.
In a bowl, using a wooden spoon, beat the butter, herbs, orange zest, salt and pepper until well blended. Set aside.
Gently slide your fingers under the breast to loosen the skin and work your fingers down to the thigh, being careful not to tear the skin. Spread one-third of the butter mixture evenly under the skin. Spread one-third of the mixture inside the body cavity, then spread the remaining mixture evenly on the outside of the turkey. Truss the turkey if desired using kitchen twine.
Place the turkey, breast side up, on a rack in a large roasting pan and roast for 45 minutes. Reduce the heat to 325°F and continue roasting, basting every 30 minutes with the pan juices. After about 2 1/2 hours of total roasting time, begin testing for doneness by inserting an instant-read thermometer into the thickest part of the breast and thigh, away from the bone. The breast should register 165°F and the thigh, 175°F. If the breast begins to cook too quickly, tent it loosely with aluminum foil. Total roasting time should be 3 to 3 3/4 hours.
Transfer the turkey to a carving board, cover loosely with foil and let rest for 20 minutes before carving.
Serves 12 hungry people.
Monday, November 7, 2011
Simple Herb Roast Chicken
There is something very warm and comforting about a simple roasted chicken on a chilly autumn evening. It need not be complicated in flavor or preparation, but there are a few key points to getting it just right. Start with a high-quality bird, season it correctly, cook it at a high temperature for the ideal amount of time for its weight and let it rest before you carve it.
The herbs listed here are ones that make a good simple roast chicken, but of course you can add any of your favorite herbs. I sometimes add lemon or orange slices as well. Slice them very thinly and slip a few slices under the skin with your herbs, and don't forget to stick a few in the cavity as well. The juices from the citrus will steam on the inside, infusing the chicken with even more flavor.
This can be served with just about anything from mashed potatoes to buttered noodles and of course the leftovers are just as versatile. Use them for soup, chicken tacos, sandwiches, pasta... Be creative!
Ingredients:
1 roasting chicken, 4 to 5 lb.
2 teaspoons chopped fresh rosemary, plus one 4-inch sprig
1 Tablespoon chopped fresh thyme, plus 3 bushy sprigs
1 Tablespoon chopped parsley (preferably Italian Flat leaf)
1/4 cup extra-virgin olive oil, plus more for rubbing
Freshly ground pepper, to taste
2 tsp. kosher salt, plus more, to taste
1/2 small yellow onion
3 large garlic cloves
Directions:
Preheat the oven to 425°F. Cut off the chicken’s tail with kitchen scissors. Remove the giblets and remove the excess skin and fat from the cavity and neck.
In a small bowl, stir together the chopped rosemary, thyme and parsley and the 1/4 cup olive oil and season with pepper. Gently separate the chicken skin from the meat with your fingers, being careful not to tear the skin. Loosen the skin above the cavity the same way, reaching in as far as possible to loosen the skin on the tops of the thighs and legs. Slip the herb mixture between the skin and flesh, and rub it evenly over the exposed meat, covering it as much as possible. Pat the skin back into place and tuck the wing tips under.
Season the cavity with the 2 tsp. salt, then stuff with the herb sprigs, onion and garlic, pushing them in as far as they will go. Tie the legs together with kitchen string.
Rub the outside of the chicken with olive oil and season well with salt. Place, breast side up, in a roasting pan. Roast the chicken until the juices run clear when the thigh is pierced, about 1 hour and 10 minutes (12 to 15 minutes per pound), or a thermometer inserted in the thickest part of the thigh (not touching bone) registers 165°F. THIS IS VERY IMPORTANT: Let the chicken rest for 15 minutes before carving. This will allow the juices in the chicken to re-distribute into the meat, making it stay moist, tender and flavorful.
enJoy!
The herbs listed here are ones that make a good simple roast chicken, but of course you can add any of your favorite herbs. I sometimes add lemon or orange slices as well. Slice them very thinly and slip a few slices under the skin with your herbs, and don't forget to stick a few in the cavity as well. The juices from the citrus will steam on the inside, infusing the chicken with even more flavor.
This can be served with just about anything from mashed potatoes to buttered noodles and of course the leftovers are just as versatile. Use them for soup, chicken tacos, sandwiches, pasta... Be creative!
 |
| This is my niece Elisa in Versailles in 2007 I know this has nothing to do with Roast Chicken, but I'm feeling nostalgic. France is incredibly beautiful in the fall. |
1 roasting chicken, 4 to 5 lb.
2 teaspoons chopped fresh rosemary, plus one 4-inch sprig
1 Tablespoon chopped fresh thyme, plus 3 bushy sprigs
1 Tablespoon chopped parsley (preferably Italian Flat leaf)
1/4 cup extra-virgin olive oil, plus more for rubbing
Freshly ground pepper, to taste
2 tsp. kosher salt, plus more, to taste
1/2 small yellow onion
3 large garlic cloves
Directions:
Preheat the oven to 425°F. Cut off the chicken’s tail with kitchen scissors. Remove the giblets and remove the excess skin and fat from the cavity and neck.
In a small bowl, stir together the chopped rosemary, thyme and parsley and the 1/4 cup olive oil and season with pepper. Gently separate the chicken skin from the meat with your fingers, being careful not to tear the skin. Loosen the skin above the cavity the same way, reaching in as far as possible to loosen the skin on the tops of the thighs and legs. Slip the herb mixture between the skin and flesh, and rub it evenly over the exposed meat, covering it as much as possible. Pat the skin back into place and tuck the wing tips under.
Season the cavity with the 2 tsp. salt, then stuff with the herb sprigs, onion and garlic, pushing them in as far as they will go. Tie the legs together with kitchen string.
Rub the outside of the chicken with olive oil and season well with salt. Place, breast side up, in a roasting pan. Roast the chicken until the juices run clear when the thigh is pierced, about 1 hour and 10 minutes (12 to 15 minutes per pound), or a thermometer inserted in the thickest part of the thigh (not touching bone) registers 165°F. THIS IS VERY IMPORTANT: Let the chicken rest for 15 minutes before carving. This will allow the juices in the chicken to re-distribute into the meat, making it stay moist, tender and flavorful.
enJoy!
Wednesday, October 26, 2011
Hot Tamale!
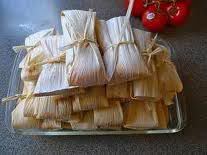
As my cooking skills and love of food grew over the years, I decided to take on the

All that said, while tamales are not hard to make, they are quite time consuming, so be prepared for a half day adventure. This recipe will yield 24-30 tamales, depending on how heavy handed you are with the dough. Even if you only want a few, I recommend that you go ahead and make a whole recipe, as they freeze beautifully! And while your at it, double the recipe and keep the extras frozen for a nice afternoon treat, or a quick weekday lunch.
Ingredients:
For the Meat Filling:
2 Pounds of boneless skinless chicken breasts
8 dried California chili peppers (can be found in the Mexican aisle of your grocery store)
1/2 teaspoon chili powder
1 teaspoons ground cumin
1/2 teaspoon ground coriander
1/4 teaspoon cayenne pepper
1 teaspoon kosher salt
1 small yellow onion, finely chopped
3 cloves of garlic, minced
1/2 cup of chicken stock
1/4 cup of juice from canned jalapenos
For the wrappers:
One bag of dried corn husks (can be found in the Mexican aisle of your local grocer)
For the dough:
4 cups of masa harina
2 1/4 teaspoons baking powder
1 teaspoon of cumin
2/3 cup of lard
2 to 4 cups chicken broth
Salt to taste
Directions:
For the wrappers:
About an hour prior to the start of your adventure, place the husks in a large bowl or pot and cover completely in hot water. Soak the husks until they are soft and pliable, at least 45 minutes and up to 2 hours.
For the Meat:
Place the chicken breasts in a pot and cover with water. Bring it to a boil, reduce the heat to keep them simmering and let cook until the chicken is cooked through (approx 20 minutes).
While this is happening, place your dried chili peppers in a small pan and cover with water. Bring the water to a boil and turn off the heat. Cover the pan and let the chili's steep for 15 minutes to soften them. Once they have softened, remove the stems and place them in a blender (reserving the liquid). Add the remaining "filling" ingredients and blend, adding the reserved chili liquid, one Tablespoon at a time, until a thick sauce is formed (about the same thickness as a gravy).
Remove the chicken from the hot liquid and let cool until handleable. Shred the chicken and toss it with the red chili sauce. Season to taste with salt and pepper. Remember that this is the main source of flavor for your tamale, so make sure it is slightly hotter and more seasoned than you think it should be. The bland flavor of the masa will tone down the flavor of the chicken mixture once it is combined.
For the dough:
In the bowl of a mixer, place the lard and mix on high speed until it is slightly fluffy looking. Add the masa, cumin, and baking powder and mix to combine. Gradually add enough of the reserved cooking liquid, 2 to 4 cups to create a dough that is like thick mashed potatoes. The dough should be moist but not wet. Cover the bowl with a damp towel and set aside until ready to use.
To assemble the tamales:
Remove two corn husk from the water and pat to remove excess water. Lay them together with the wide sides overlapping each other. Spread about 1/3 of a cup of the dough in an even layer across the middle of the husk to within 1/2-inch of the edges. Spoon about a heaping Tablespoon of the meat mixture in a line down the center of the dough. Roll the husk so the dough surrounds the meat and fold the ends under to finish creating the tamale. Use a string or a thin strip of the corn husks to tie aournd the middle of the tamale, holding the loose ends in place. Repeat until all the husks, dough and filling are used.
To steam the tamales:
Place a steamer basket in the bottom of an 11-quart pot and add enough water to come to the bottom of the basket. Layer the tamales on top of the steamer basket. Bring the water to a boil over medium heat, then cover and reduce the heat to maintain a simmer. Check the water level every 15 to 20 minutes, and add boiling water by pouring down the side of the pot, if necessary. Steam until the dough is firm and pulls away from the husk easily, 1 to 1 1/2 hours.
Serve warm. Store leftover tamales, tightly wrapped in plastic wrap, in the freezer, for up to a month. To reheat, remove the plastic wrap and steam until heated through.
Tuesday, October 25, 2011
Beef, It's what's for dinner
One of my favorite meals is Beef Stroganoff. I've taken years to perfect it with just the right amount of rich beefy flavor and creamy goodness in the sauce. The beauty of this dish is that you can use almost any cut of beef and while I have never done it with ground beef, I know it would be just as good. There are not a lot of ingredients in it either, making for a nice "on the fly" meal. This is delicious enough to serve for a dinner party, but easy enough to prepare on any hurried evening. Although this is traditionally served over noodles, it is excellent served over steamed white rice.

Beef Stroganoff
Ingredients:
1 Pound of Wide Egg Noodles
2 Tablespoons of Butter
1 pound of beef (sirloin and rib eye are my favorites)
1 Tablespoon of flour
1 tsp salt
1/2 teaspoon pepper
1 pound of white mushrooms (although any kind would be good)
1 Medium yellow or white onion
2 cloves of garlic
1/2 cup white wine (optional)
3 cups of beef broth
1 teaspoon of dill
1 cup of sour cream
Directions:
 Prepare the noodles as directed on the packaging.
While the noodles are cooking, slice the beef across the grain in as thin of slices as possible. The thinner you slice, the more tender the beef will be once cooked and of course the faster it will cook. To make this easier, I like to put my beef in the freezer for about 15 minutes prior to slicing it. This will firm it up enough to make your slicing much easier.
Toss the sliced meat with the flour, salt and pepper to lightly coat your meat. This is called dredging. Set this aside while you prepare the remaining ingredients.
Chop the onion in medium dice
Slice the mushrooms (whatever thickness you like)
Crush the garlic cloves
Place a large skillet over high heat and put the butter in the pan. As soon as it melts, add the beef and fry until it starts to brown and cooked through. Add the mushrooms, onions and garlic and continue to cook until the onions and mushrooms are starting to soften. Don't be afraid to get some good browning on your ingredients at this point. The more you brown, the more flavor you get. Although, be careful not to actually burn. That flavor is not such a good one!
Reduce the heat to medium and add the white wine. Cook until the wine is reduced in half.
Add the beef broth, increase heat to medium high and bring to a boil. Add the dill and continue to cook until the broth is reduced by about half (approximately 5 minutes). ***Alternately, you can add one and a half cups of water and 1 Tbs of beef bullion paste and skip the reducing process, but do make sure to bring the liquid to a boil before proceeding***
Turn the heat off and stir in the sour cream.
Do not bring the stroganoff back to a boil once you have added in the sour cream, this will likely cause it to separate and create an unappealing texture to your sauce.
Serve piping hot over the warm egg noodles.
enJoy!
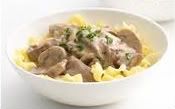
Beef Stroganoff
Ingredients:
1 Pound of Wide Egg Noodles
2 Tablespoons of Butter
1 pound of beef (sirloin and rib eye are my favorites)
1 Tablespoon of flour
1 tsp salt
1/2 teaspoon pepper
1 pound of white mushrooms (although any kind would be good)
1 Medium yellow or white onion
2 cloves of garlic
1/2 cup white wine (optional)
3 cups of beef broth
1 teaspoon of dill
1 cup of sour cream
Directions:
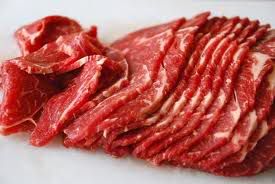
While the noodles are cooking, slice the beef across the grain in as thin of slices as possible. The thinner you slice, the more tender the beef will be once cooked and of course the faster it will cook. To make this easier, I like to put my beef in the freezer for about 15 minutes prior to slicing it. This will firm it up enough to make your slicing much easier.
Toss the sliced meat with the flour, salt and pepper to lightly coat your meat. This is called dredging. Set this aside while you prepare the remaining ingredients.
Chop the onion in medium dice
Slice the mushrooms (whatever thickness you like)
Crush the garlic cloves
Place a large skillet over high heat and put the butter in the pan. As soon as it melts, add the beef and fry until it starts to brown and cooked through. Add the mushrooms, onions and garlic and continue to cook until the onions and mushrooms are starting to soften. Don't be afraid to get some good browning on your ingredients at this point. The more you brown, the more flavor you get. Although, be careful not to actually burn. That flavor is not such a good one!
Reduce the heat to medium and add the white wine. Cook until the wine is reduced in half.
Add the beef broth, increase heat to medium high and bring to a boil. Add the dill and continue to cook until the broth is reduced by about half (approximately 5 minutes). ***Alternately, you can add one and a half cups of water and 1 Tbs of beef bullion paste and skip the reducing process, but do make sure to bring the liquid to a boil before proceeding***
Turn the heat off and stir in the sour cream.
Do not bring the stroganoff back to a boil once you have added in the sour cream, this will likely cause it to separate and create an unappealing texture to your sauce.
Serve piping hot over the warm egg noodles.
enJoy!
Sunday, October 16, 2011
Tom Kha Gai...I don't speak Thai..
Tom Kha Gai
Chicken Coconut soup with lemongrass
Ingredients:
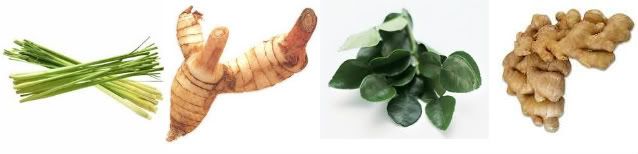 |
| Lemon Grass, Galangal Root, Kaffir Lime Leaves, Ginger Root |
1 Tablespoon of red chili paste
2 shallots finely chopped
1 Tbs vegetable oil
4 cups chicken broth
8 large slices of peeled fresh galangal or 4 slices of fresh ginger (slices should be about 1/2 inch thick)
1 large lemongrass stalk. One large stalk is equal to about 4 of the little ones found in most grocery stores or about 16 inches long. Crush each piece with a hammer or the backside of a knife to release more flavor.
16 kaffir lime leaves or the grated zest of 1 large lime
2 14 ounce cans of coconut milk
1/4 cup of lime juice
2 Tablespoons Thai fish sauce
2 Tbs light brown sugar
1 pound of boneless skinless chicken breast cut into thin slices
1/2 pound of fresh white mushrooms sliced
Fresh cilantro for garnish
In a large soup pot over medium heat, place the oil and heat until shimmering. Add the chili paste and shallots and stir until fragrant and shallots are slightly softened. Add the broth, galangal, lemongrass, and lime leaves. Bring to a boil and boil for 2 minute.
Reduce heat to low and add in the coconut milk. Stir to combine and bring to a simmer. Add the lime juice, fish sauce and brown sugar. Simmer for 5 minutes. Add the chicken pieces and simmer until tender. The thinner your slices, the quicker they will cook, so keep an eye out so you do not over cook your chicken. Add the mushrooms and simmer for 2 more minutes.
Serve piping hot, with extra Sriracha for those who like extra heat.
enJoy!
Wednesday, October 12, 2011
Meatballs!!!!!!!!!!!!
Ingredients:
1 1/2 pounds of ground beef
2 tsp chopped fresh parsley
1 1/2 cups panko bread crumbs
1 large egg
1/4 cup of evaporated milk
1/2 cup finely chopped onion
1/3 cup finely chopped carrot
1 teaspoon ground cardamom (or 1/4 tsp nutmeg if you don't have cardamom)
1 1/2 teaspoons salt
1/2 teaspoon of pepper
1 cup of vegetable oil
1/4 cup of flour
2-3 cups water
1 Tablespoon beef bullion
1/3 cup heavy cream
Directions:
Mix all of the ingredients in the first section. Make sure not to overwork your mixture or the meat will take on and oddly pasty consistency. Mix it just until all of the ingredients are evenly distributed. Form golf ball sized balls and set aside.
Place the oil in a large saute pan until it is 1/2 an inch up the sides. Heat on medium high heat until it is shimmery looking. Place your meatballs in the pan and cook, turning them frequently so that they are brown on all sides and cooked through. Remove your meat balls and drain all but a 1/4 cup of the oil. Make sure not to loose all the little bits that have fallen off of your meatballs, this will add extra flavor to your gravy.
Place your pan back over medium heat (with the leftover oil in it) and add the flour. Stir the mixture around until a paste forms. Allow this to cook for about a minute. This is called making a roux (pronounced roo) Add in your water and bullion, stirring to incorporate with the flour mixture. Bring the mixture to a boil and cook for 2-3 minutes. If your gravy is too think, add a little water. If it is too thin, mix some more flour and water (one part flour, two parts water) and add into your gravy 1 Tablespoon at a time until your gravy is a good consistency.
Right before serving, put a dash of cardamom or nutmeg and the heavy cream and stir to incorporate.
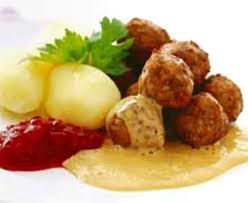
Serve over the carbohydrate of your choice. I personally like them over rice. Swedish tradition is to serve with boiled potatoes, and it would certianly be good over wide egg noodle as well. Make it your own :-)
Swede's also serve a dollop of lingonberry jam on the side, which is the perfect compliment to the meatballs, and you can actually purchase lingonberry jam at IKEA stores if there is one near you.

Subscribe to:
Posts (Atom)